Table of contents
Intro
ESP-IDF environment primary uses C language for ESP32, for such environment it also supports limited C++ usage. This tutorial will summarize usage from the official document and some GitHub projects.
The CPP it supports:
- Exception Handling
- Multithreading
- Runtime Type Information(RTTI)
- Thread Local Storage
- Filesystem Lib
- CPP features implemented by GCC with some limitations
Reference link here:
ESP32 CPP Official Document
ESP32 CPP Official Examples
This tutorial is made by using vscode platformio extension - idf mode.
The chip I am using is: ESP32-WROOM-32
Note: Both Arduino Core for ESP32 and Arduino Component for ESP-IDF are built on top of ESP-IDF.
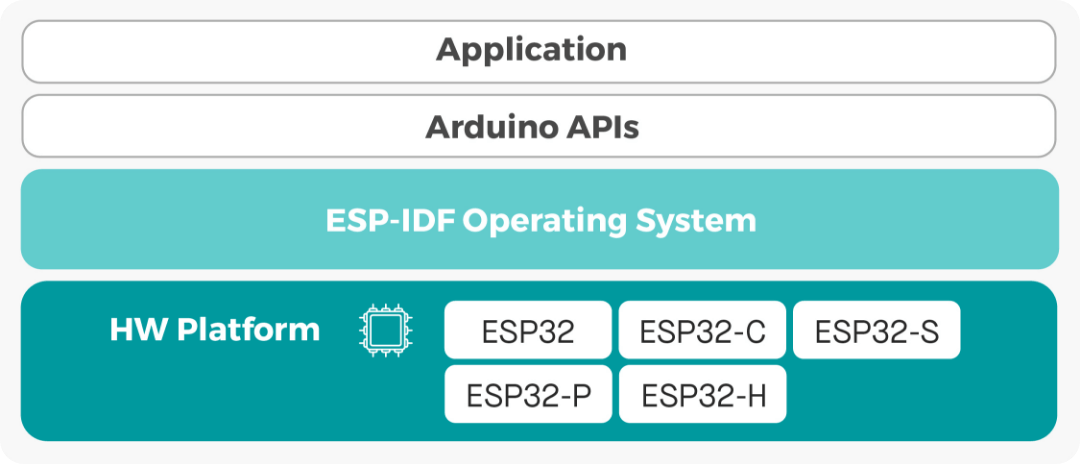 Image Credit
Environment Set Up
To begin with, open an empty folder in vscode, click the platformio extension button on sidebar and click “Create New Project”.
Click “New Project” and we can set up like this:
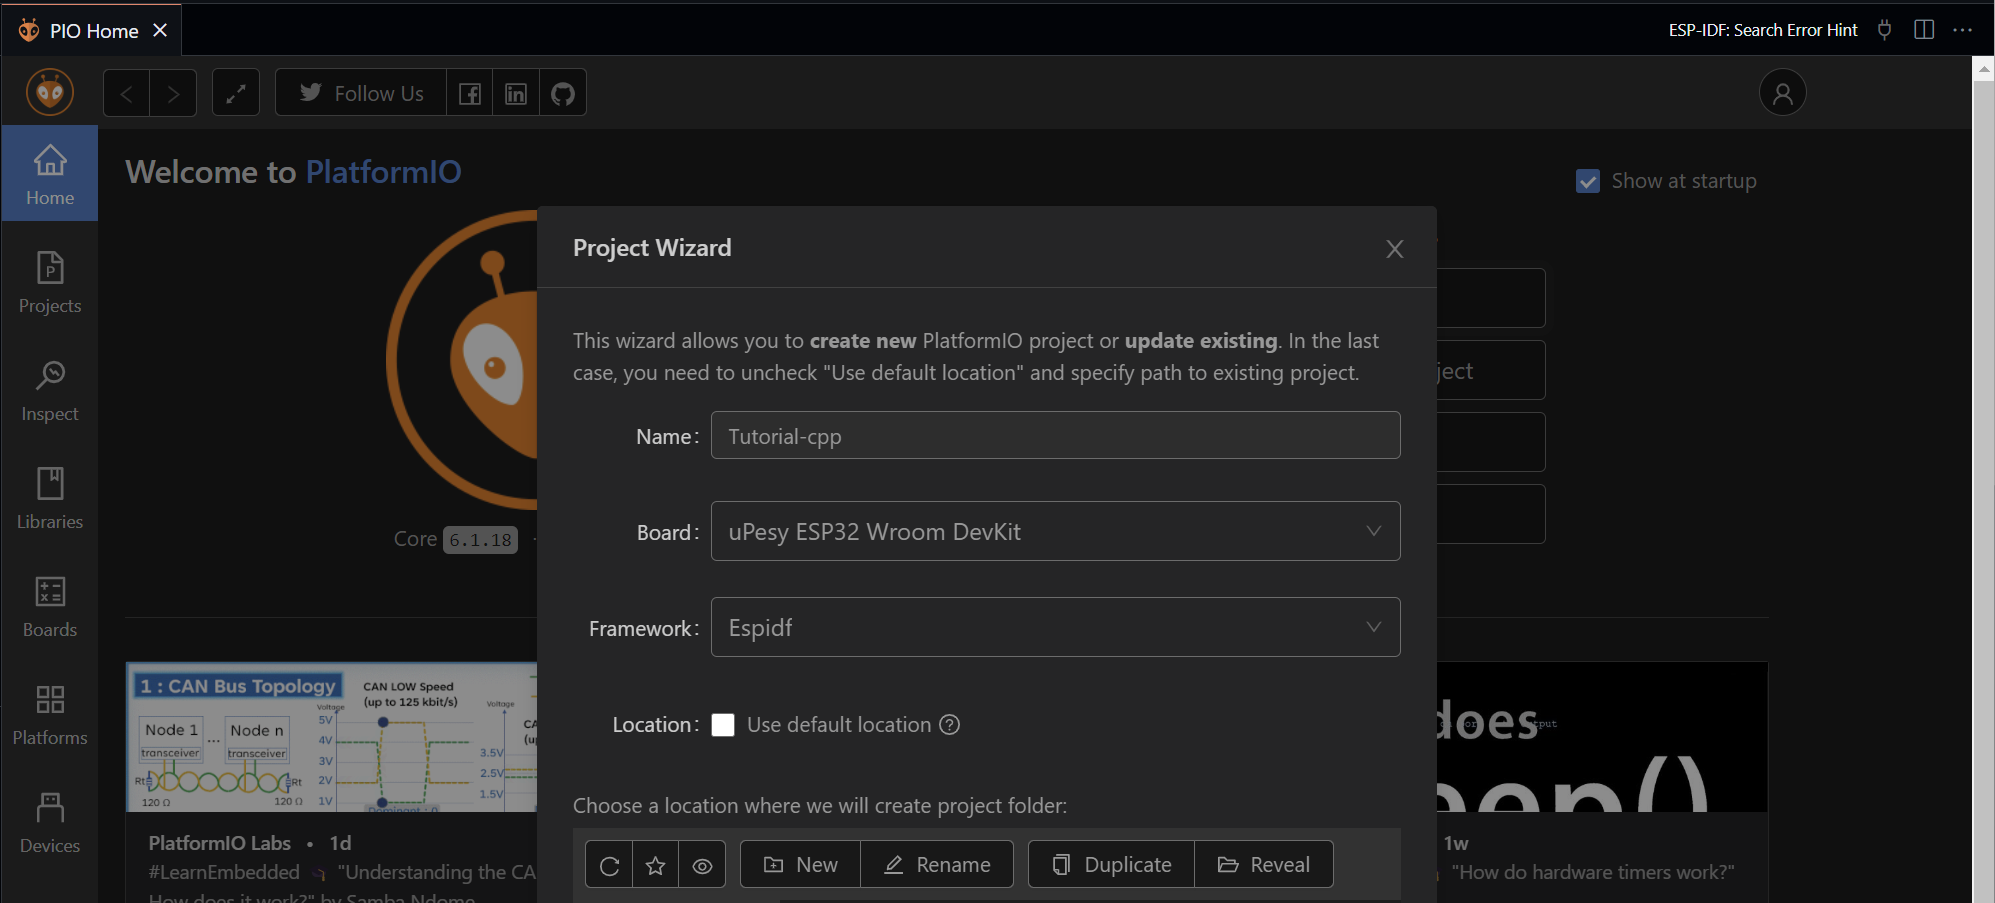 The name your project’s name, the board according to my chip should be uPesy ESP32 Wroom DevKit, and the most important is the Framework - it should be Espidf.
By deselect the “Use default location” enable you to save your project somewhere else.
The name your project’s name, the board according to my chip should be uPesy ESP32 Wroom DevKit, and the most important is the Framework - it should be Espidf.
By deselect the “Use default location” enable you to save your project somewhere else.
After setting this, click “Finish” button on the right bottom. Tip: You may need to wait a while to let it set up!
After waiting for it to set up, you should have a similar window like this:
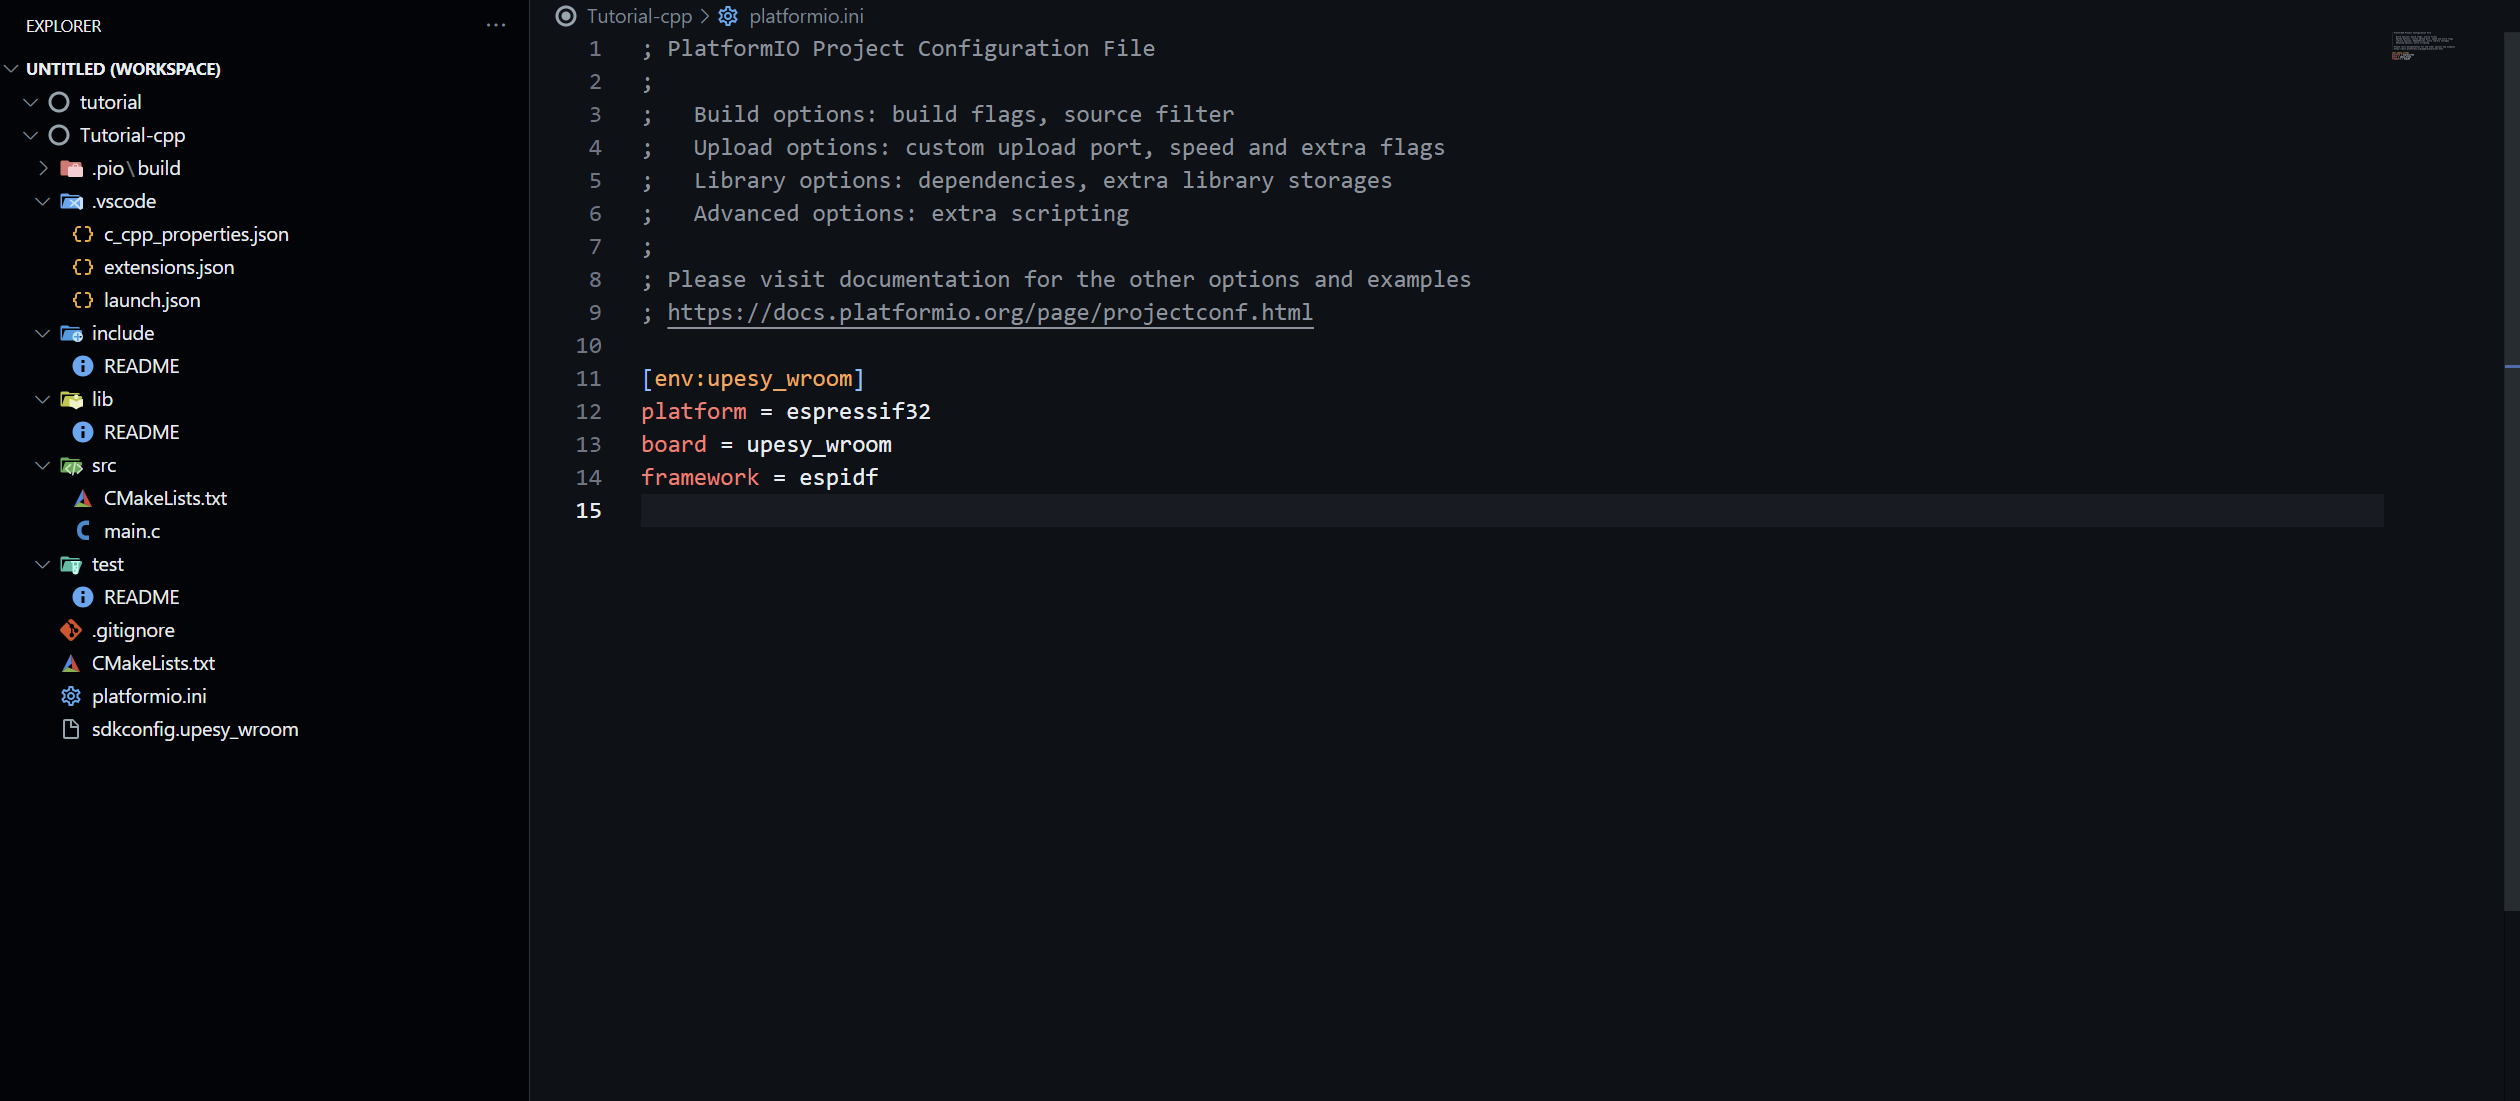
For here we can see several folders:
-
.pio folder: managed by PlatformIO. It contains build artifacts, compiled object files, firmware binaries (
.bin,.elf), downloaded toolchains, and project dependencies (libraries) that PlatformIO manages for you. -
include folder: used for your header files with suffix:
.hppor.h -
lib folder: project-specific libraries or third-party libraries that are not managed by the PlatformIO Library Manager.
-
src folder: used for your source code files with suffix:
.cppor.c -
test folder: Used for unit tests or other test code for your project.
-
CMakeLists.txt: main configuration file for PlatformIO.
-
sdkconfig.upesy_wroom: It stores the project’s configuration settings for various ESP-IDF components and features (like Wi-Fi and Bluetooth,etc.)
First CPP project for ESP-IDF
Now we should begin with our first project.
Firstly, we should make sure our CMakeLists.txt in root folder has such content:
cmake_minimum_required(VERSION 3.16.0)
include($ENV{IDF_PATH}/tools/cmake/project.cmake)
project(Tutorial-cpp)
We will do our code in the src folder, the src folder is in the root folder, by clicking the src folder, we can again find
out there are two files within:
one of them is CMakeLists.txt and the other is main.c file.
Firstly, we should make sure our CMakeLists.txt in the src folder is like this:
# This file was automatically generated for projects
# without default 'CMakeLists.txt' file.
FILE(GLOB_RECURSE app_sources ${CMAKE_SOURCE_DIR}/src/*.*)
idf_component_register(SRCS ${app_sources})
To write the C++ code, we should have our main file with suffix cpp, we can rename our .c file directly.
Right now, we can begin coding with cpp!
Hello, World!
Let’s begin with the most simple one - print “Hello, World!”:
Since the esp-idf expects the application entry point, app_main, to be defined with C linkage.
When the app_main is defined in cpp source file, we should use extern "C" (This is language linkage):
#include <iostream> // it supports iostream lib
#include <unistd.h> // used for sleep function
using namespace std;

extern "C" void app_main(void) // very important in cpp source file! need extern "C"
{
    while (1) {
        cout << "Hello world!!" << endl;
        sleep(1);
    }

}
Now we can compile and upload our code to esp32, before that, we should make sure the esp32 can talk to our computer with
correct baudrate, otherwise it will be random code, check the platformio config file - platformio.ini:
; PlatformIO Project Configuration File
;
;   Build options: build flags, source filter
;   Upload options: custom upload port, speed and extra flags
;   Library options: dependencies, extra library storages
;   Advanced options: extra scripting
;
; Please visit documentation for the other options and examples
; https://docs.platformio.org/page/projectconf.html

[env:upesy_wroom]
platform = espressif32
board = upesy_wroom
framework = espidf
lib_deps = adafruit/Adafruit SSD1306@^2.5.14
monitor_speed = 115200 ; <- this is very important!
If this is ok, we can now compile and upload our code to esp32!
Find the tick button on the right-top and it have a dropdown box
click the upload, upload will auto compile file if not compiled before.
To see the output from esp32, we need to turn on the
serial monitor, which is located at the bottom bar of vscode, there is a plug icon, click on that and we can see the output:
Hello world!!
Hello world!!
Hello world!!
Hello world!!
Hello world!!
Hello world!! ...
To stop it we can use hotkey: Ctrl+C to terminate!